These are the 6 steps to follow when starting a blog:
- Decide what you will be blogging about.
- Choose your blogging platform.
- Pick a host.
- Find your domain name & start your WordPress blog.
- Design your website.
- Get blogging!
Why should you start a blog?
1. You can make money while working from anywhere.
Blogging provides the opportunity to work from any location of your choice. As a college student, it can be particularly challenging to secure employment due to the variability of your schedule. However, maintaining a blog enables you to generate income from virtually anywhere, and it can even yield revenue during periods when you are not actively engaged in it.
2. It’s fun!
You get to write about things you love and get paid for it. It really doesn’t get much better!
3. You can make money around the schedule you want.
Change is inevitable and it can be SO hard to find a job that is can fit with life’s demands. A blog allows you to make money around times YOU are available.
Here are some reasons why you DON’T want to start a blog on a “free” hosting platform:
1. Certain free services control the amount of money you are able to make.
The reason they do this is because they want you to pay for their “upgrade”. They also don’t give you much support because they aren’t getting anything from you and really aren’t worried about keeping you happy.
2. You only have basic features available.
With a free blog, you get the bare minimum amount of features. You have limited options on what you want to make your website look like. You also have to put their name at the end of the website in many cases. It does not look professional!
3. If you decide to upgrade to the better service, you could lose all your work.
Learn from me and don’t do what I did! Moving from a free blog to a paid blog can result in your old posts not working anymore. The links change, the format gets messed up, or you just lose it entirely. It will cost you hundreds of dollars to hire someone and fix all of that mess!
4. When you pay for something, you are more likely to stick with it.
Let’s be real…when you pay for something you are a million times more likely to stick with it. The people that pay for it take it much more seriously and are the ones that really become successful. The people that get it for free are much more likely to quit because it can become hard work and they give up since they don’t have any value in it.
How to Set up a Blog:
1. I use and only recommend WordPress.
WordPress has two different options that you can choose. They have a hosted option (www.wordpress.com) and a self-hosted option (www.wordpress.org)
It is by far the most popular among beginner AND long-term bloggers.
2. Pick a host
You need to pick a host to get your website “live” and viewable to the public. Basically, it does all the “background” information.
There are variety of option that can be considered. I personally use Dream host, but both a fantastic when starting out.
Disclamer: We do make a commission if you end up buying your hosting through Dream Host. Definitely do your research on other hosts, but I found for what I was looking for, Dream Host had the best options at the cheapest prices. After using it for two years and having a great experience, I still recommend it.
3. Go to your preferred Hosting website
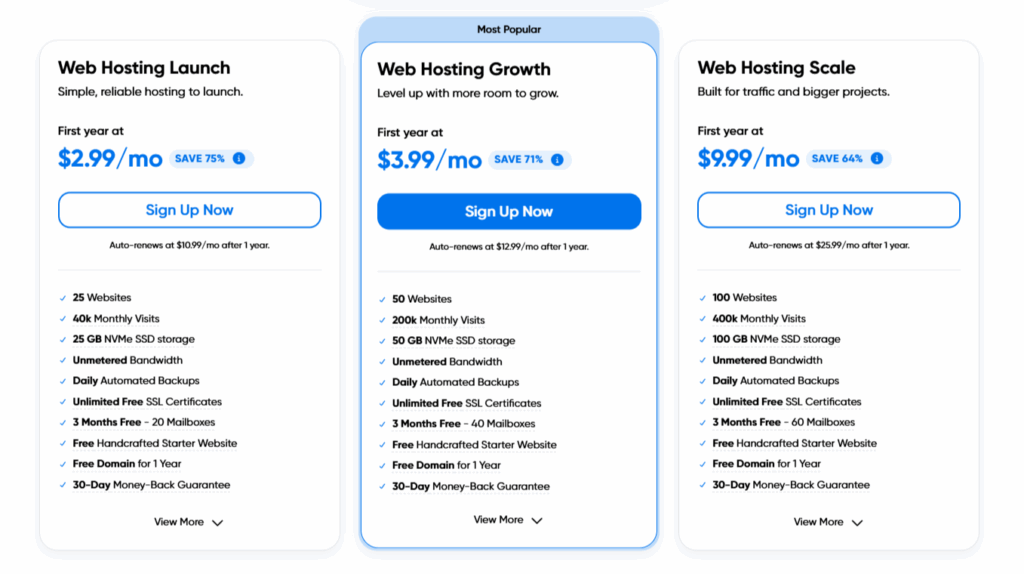
For this blog i will be using Dream Host, choose your plan that is most suitable for your use.

You’ll be shown three options. When I started I got the Web Hosting Growth plan just because the basic will plan will work.
You’ll start seeing the difference between the two plans once you start getting a lot of views.
4. Pick a blog name/domain

This is where you will be able to start playing with domain addresses. Your domain address is what people type into the search bar to get to your website. For example, mine is 34lyfe.com (don’t add the .com when searching domains!).
Some things to think about when choosing your domain:
- Don’t make it complicated
- Make it something the reader will remember
- Make sure the URL is available to end in .com!
You will know if the name you are thinking about is already taken if it says “Unable to Continue”. This can get frustrating if you find out the name you want is being used, but just keep trying!! You will find the perfect name!
If you can not think of any names, do not worry. You do not have to choose now.
If you already have a domain name, put it into the “I have a domain name” box and continue following along with these instructions (they are almost exactly the same).
5. Design your website
This was by far my favorite part of setting up my website.
After logging in from the last step, you will be taken to a screen that will prompt you to pick different themes. The theme you choose is what your website will look like.
It’s the first thing people will see so you want to make sure your blog looks put together and professional.
That is it for setting up your blog!
Congratulations! You officially have a blog up and running!
My biggest tip to you: Just start writing your mind. The only way to be a successful blogger that makes money is to get content out there. Even if it’s not perfect, it’s still something!

